Wednesday, January 23, 2013

Grovia Hybrid Diaper

First, a little bit about our trial set of diapers.  We told the helpful employee at the Diaper Lab the following:

  • We want a diaper that is easy for our daycare provider to use during the day.
  • We have been using disposable diapers at night because our cloth prefolds give the peanut diaper rash overnight (too much wet cotton against the delicate bum) and would like to investigate cloth options for nighttime. 
  • We'd prefer snaps to velcro (our current covers stick to other things in the wash no matter how careful we are to attach all the velcro beforehand).
  • We'd prefer one-size diapers to sized diapers. 
She pulled together a trial to suit our requests while throwing in a few things (i.e., a sized diaper) to make sure we were really investigating our options before making a decision.  


The first diaper we tried at home was the Grovia Hybrid diaper.  "Hybrid" diapers allow you to use the same cover (which has a layer of waterproofing) with both disposable inserts and cloth inserts.  This diaper system also allows you to re-use the same cover as long as it wasn't wet/dirty.  The idea of a hybrid diaper is very tempting - it seems to afford the flexibility to cloth diaper when you can and to use disposables when you can't.  What's not to love? We didn't have any disposable inserts in our trial but we did have two of the cloth inserts.


Here, you can see the insert (on the left), which snaps into the cover (on the right).  The insert is composed of two separate parts and is very bulky.  The cover is the "one size" part - you can adjust the rise and the waist with the snaps.


Here's the diaper on the peanut, who is only about 3 months old here but SUPER into standing, especially on her changing table.  That's why she has that look on her face.

Heyyyy!

It looks relatively trim in the photo but was super bulky on.  I also wasn't a huge fan of the snap-in-insert system.  We wouldn't have used the disposable inserts (they are more expensive than disposable diapers and look like giant maxi pads, which is weird) and I just can't picture our daycare provider fishing through a wet and/or poopy diaper to unsnap one insert and snap in another one, so we would have had to buy just as many covers as inserts, sort of defeating the purpose.

The biggest issue with this diaper was, despite all the bulky padding, the peanut managed to pee out of the leg holes every time we used this one.  We tried different snap configurations to no avail.

Price info  (from Amazon):
2 organic cotton soaker pads, $17.95
Snap shell diaper, $16.95
Disposable "biosoaker" inserts, $19.99 for 50 (at www.gro-via.com) - almost 40 cents a diaper!

Though the idea of a "hybrid" diaper is tempting, it just didn't check the boxes we were hoping it would check, namely price, environmental friendliness, daycare-friendliness, and (importantly) NO PEE COMING OUT OF THE LEG HOLES.

We ended up returning the diaper at the end of our trial.

One Grovia product that we are over the moon for, though, is the Magic Stick.  It is a diaper rash cream that is safe to use with cloth diapers (most of the popular brands like Desitin and Butt Paste ruin cloth diapers), smells like a dream, is all-natural, and has prevented diaper rash since we started using it around Thanksgiving.  Most importantly, it's kind of like a giant tube of chapstick, which means you don't have to get cream on your fingers when doing a diaper change.  (Sorry for the uncommonly large photo - I can't resize it for some reason.)

Monday, January 21, 2013

Swaddlebees Simplex All-In-One

The second diaper we tried was the Swaddlebees One Size Simplex all-in-one diaper.  All-in-one diapers are made up of one part - the waterproof layer is sewn to the absorbent layer.  When one part is dirty, the whole thing is dirty.  For this reason, this diaper is very daycare friendly.  The only difference between using an all-in-one and a disposable is where the diaper goes when it's dirty (bag to take home vs. trash).  The other important feature of all-in-one diapers is the price - they are generally the most expensive of all the options (other than the hybrid diapers).

This all-in-one diaper has a "tongue" that you can either shove into the pocket between the absorbent layer and the waterproof layer or lay across the top (see second photo below).  The Simplex is unique (at least among the diapers we tried) because if you shove the tongue into the pocket, soft organic cotton is next to baby's bum.  If you lay the tongue across the top, stay-dry fleece is  next to baby's bum.

The tongue has organic cotton on one side...

...and "stay-dry" fleece on the other.

The outside - adjustable with the rows of snaps to the left.

At first, I liked this diaper the best of all the all-in-ones that we tried.  I especially liked the option to have nice cotton during the day and fleece during the night.  After a few washes, however, it became clear that the nice, organic cotton held onto poop stains like whoa (you can probably see some in the photos above).  I also read some online reviews indicating that, if you laid the tongue across the top of the diaper, it slid out the leg hole once the baby began crawling.  Hmm.

Here's the diaper on:

Sumo wrestler! 
This diaper wasn't as bulky as this photo makes it look but the waistband was problematic - it scrunches up beneath the muffin top (see photo).  Making the snaps looser meant that it fell down and making it tighter made it wrinkle up more. When it was wrinkled up, the white part (i.e., the part that will be soaked in pee) peeks out and sometimes wicks moisture onto the clothing.

Although we liked the cotton/fleece option, the fit around the waist, the potential for problems once the peanut can crawl, and the stain factor made this diaper a no-go.

Price info (from Amazon):
Swaddlebees Simplex One Size All-in-one diaper, $25.95
[different colors are different prices, from $25.95 all the way up to $39.95]

Saturday, January 19, 2013

Update: The Nursery and the Next Quest!

On October 8, 2012, our baby girl arrived, screaming her head off. Lucky for her, I was better about finishing her nursery than I was about sharing progress on the blog. Here are some photos of how it all turned out!


 The crib, complete with home-made balloon mobile.


Home-made roman shades, rocking chair, and "Gladys" the goose/nightlight, who lived in  my room when I was little. The chair hasn't been reupholstered yet, but the peanut loves the navy and white pattern so much that I'm not sure we'll be using our nice green fabric after all.  Those roman shades were the biggest PITA on the planet, largely because they needed to be very square and precise and I was using subpar tools (rusty Fiskars and a carpentry measuring tape, as it turns out).  If I ever make roman shades again, I will use a rolling cutter and a measuring mat like the pros.  But I'll never make roman shades again, so that's a moot point.


Diaper changing area. The two pieces of art on either side of the shelf were given to us by talented family members. On the shelf is a jar of advice and wishes that baby shower guests wrote for the peanut.


The peanut herself!  This photo was taken when she was very new - I know this because she can bust out of blanket swaddles in three seconds flat now. 

Gladys, holding down the fort.


The next quest is baby-related so if you don't care about babies, you can tune out for awhile.  We decided to use cloth diapers to save some money and some landfill space but, like so many, were nervous to make an investment into a stash of diapers only to find out that they didn't fit right or were hard to wash or something.  There is plenty of information online about cloth diapers but everyone is so devoted to their particular brand for their particular reasons that it's tough to translate the advice.  We had some regular old prefolds and covers for the newborn stage but the peanut is growing like a weed and doesn't fit into her newborn diapers anymore.

Enter a local business, the Diaper Lab, which runs an awesome "Experiment to Own" program.  For $35, you get 8 brand new diapers, a diaper pail liner, and several samples of cloth-diaper-friendly detergent to try out for two weeks.  At the end of the two weeks you return the diapers you don't want (which they clean/sanitize and sell at a discount) and keep what you do want.  (More information on the program here.)

So get ready. This quest will be useful for those of you considering cloth diapers and for those of you who want to see some funny photos of our baby in her diaper.  She'll be embarrassed about this in middle school, but it's all in the name of questing!!

((Important note: If you know us, you know the peanut's name. Though we will be showing you photos of her in her diaper, we will not be sharing her name on this blog. Call us crazy. That said, if you comment (please comment!!) please don't use her name. Thank you!))

Update: The Kitchen

Since I last updated you, the kitchen has gone from not finished to ... slightly more finished. Being pregnant, finishing the nursery, and trying to put one foot in front of the other derailed our best laid plans for grouting and - especially - for deciding on, purchasing, and installing the open shelving.

But with the baby's arrival came my dad, who is great at home maintenance/repair/renovation and seems to like it too. Not only did he grout and install one open shelf but he also reorganized and relit our basement, changed two light fixtures, hung a curtain in our bedroom, and completed many other projects too numerous to name. All this would have taken us forever to complete and we couldn't have been more thankful for my dad's willingness and ability to take care of things while he was here. 

The first step in all of this was to figure out what we wanted for open shelving and how we would get it up on the wall (drilling through tile). We had been looking online and in stores (Home Depot and The Door Store in Cambridge) for wood options.  I wanted something that was thicker than the standard 3/4 inch or 1 inch shelving and that was solid wood (as opposed to laminate). Easier said than done, apparently. Not only do the prices mount rather quickly for something like that, but 1.5 to 2 inch slabs of solid wood are heavy and would have required major anchoring independent of all the heavy stuff we planned to stack on the finished shelves. 

Hmm.

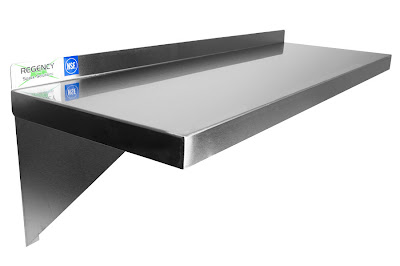
Then somehow, in my foggy new mom haze, I thought to check a restaurant supply website for stainless steel shelving. These babies had it all - they were the perfect length, lightweight, matched the drawer pulls, and were cheap! 


I ordered two, but one came bent. It's replacement arrived approximately twenty minutes after my dad got on a plane out of Boston, so it's sitting in the basement waiting for him to come back. We could attempt installation ourselves but, as neither Drew nor I witnessed all the steps and drilling through our precious tile is no task for the faint of heart, we're happy to live with one shelf for now. It looks pretty good, if I do say so myself!


Finally, my dad replaced the ceiling light fixture with something that actually gave off light. The old boob light had this crazy fluorescent bulb that hardly gave off any light. We could have tried replacing the bulb, but we couldn't find one anywhere. Even in the lighting aisle at Home Depot, where you can buy all the light bulbs known to man, there was nothing that even resembled this crazy thing. It also just seemed like the fixture didn't have enough capacity to give off the kind of light you need in a kitchen. You know, where you use sharp knives. 

Although the wiring in the house is ancient, my fantastic dad was able to install this bad boy:


(Don't mind the odd halo or seemingly dark room. It's really good in person but my photo skills are lacking.)

It gives off lots of light and our fingers are safer than they were from accidents. Hooray!

So there you have it. We are one open shelf from closing the book on the crazy kitchen remodel (until we need new appliances!)